
Sometimes you may want to measure the square footage of a layout from an image. This may be to help check whether your furniture fits or do planning for other construction updates. SimpleDim can be a great help for you in this case!
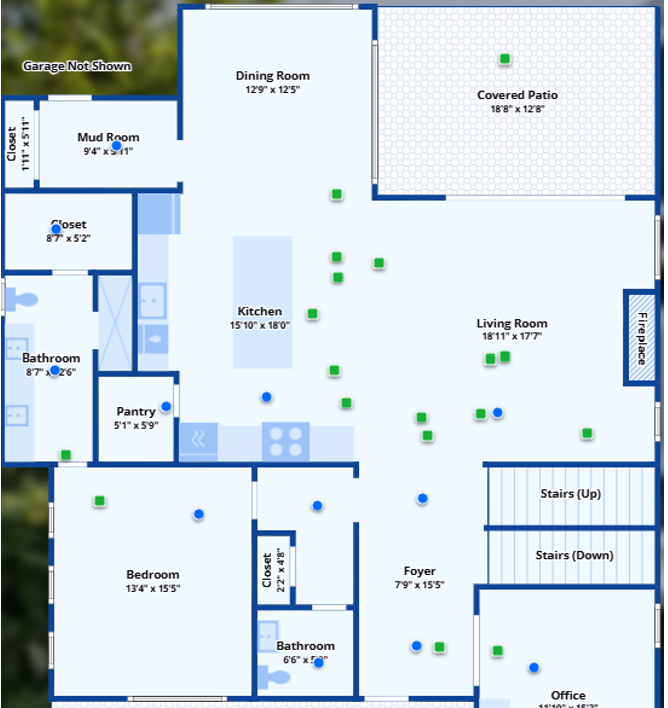
Let’s start with a typical example. Say you’re buying a house and want to check some key dimensions, such as how much carpet you may need for a replacement, or how your existing furniture will fit into the rooms. The floor plan PDF from the listing agent has some dimensions labeled, but, naturally, none of them are the ones you want.
At this point, most people may eyeball it, dig out a ruler and measure, or create an Excel sheet with a bunch of rectangles and guesses.
But–you guessed it– there’s a better way! And it’s sitting inside a program you already own.
In this post we’ll take a real Zillow floor plan and get real numbers out of it using SimpleDim in Powerpoint. The same approach will work for warehouse plans, retail spaces, event venues, offices, and so on. A floor plan is a floor plan. If you’d rather watch than read, the walkthrough video is below.
Step 1: Get the floor plan into Powerpoint
Find your floor plan from a website, CAD, PDF, or even a picture from your phone. Cut & Copy it into a PowerPoint slide. SimpleDim doesn’t care where it came from, and we can teach the slide what the image means.
Step 2: Set the scale from a known dimension
What makes SimpleDim work is its ability to set a scale for each slide. You can input a scale yourself (for example, 1 powerpoint slide inch = 5 feet). But that won’t work here; instead, we use SimpleDim’s other scale-setting feature.
The first thing to do is find a dimension you trust. On this floor plan, we saw that one side of the bathroom was 5’2″. While any of the labeled dimensions would do, we chose this one. Then draw a PowerPoint line shape along the 5’2″ wall. It’s the shorter one in the bathroom, so easy to detect.
Then, with the line selected, click SimpleDim’s Set Scale From Line tool. This will bring up a dialog asking you how long the line is “in real life”, or what scaled value it represents. We know that it’s 5’2″, or 62 inches. Enter “62”, ensure units are set to Inches, and click OK. Done! Now your slide is correctly scaled.
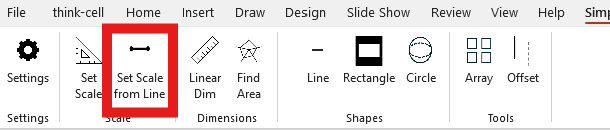
You can verify this by opening the SimpleDim Settings task pane and checking the scale. You can also change it if you need to do it.
From here, every measurement and shape on the slide will be done in slide’s scale.
One tip: We picked a short dimension here, but choosing a longer one will reduce measurement error. This is because PowerPoint rulers are in points, and a point or two discrepancy over a long distance is a lower percentage error than over a short distance.
Step 3: Trace the area you want to measure
Now for measuring the floor area for carpet.
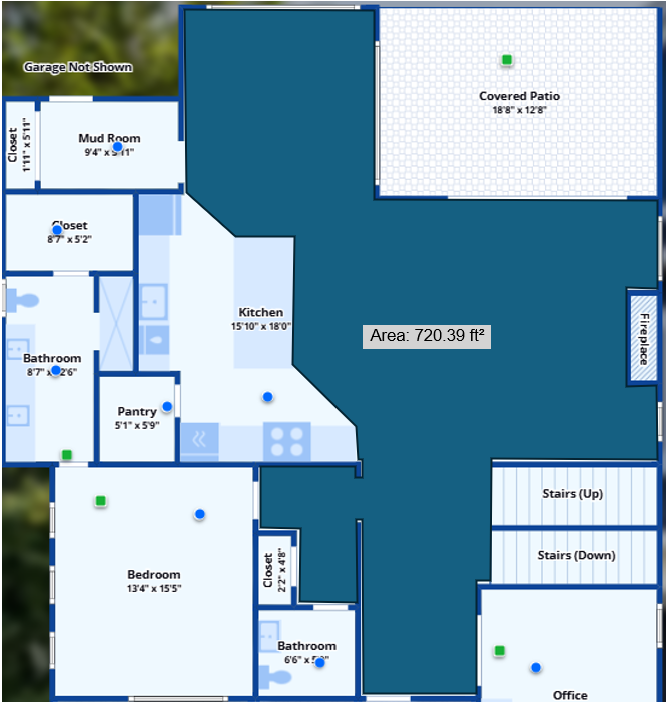
Let’s look at what we want covered: Dining room, living room, some of the kitchen, foyer, bedroom hallway. We’ll exclude the parts of the kitchen which will be tiled.
Notice the shape of the resulting area. Finding out that square footage by hand would be difficult.
Since it’s not a neat rectangle, we’ll use the Freeform shape tool to trace the outline of the space, clicking at each vertex. This goes around the kitchen, hallway, walls, foyer, living room, and back up around the dining room. The detail resolution is, again, at Powerpoint’s ruler points, but it should be good enough for most purposes.
Then click the SimpleDim Find Area tool. This will find the area value of the selected shape and place it on the shape. Ours was set at inches-squared. A quick trip to the Settings scale menu lets us change the area units to feet-squared, so now we can see that the area of the shape is about 720 square feet.
No calculator, no spreadsheet, no pain. SimpleDim makes this easy. (And if you’re actually ordering carpet, add some for scrap and waste. SimpleDim can tell you the areas, but not what your installer will do…) See more on area measurement in Calculating Shape Areas in PowerPoint.
Step 4: Check whether furniture fits
This is the part most people don’t expect from Powerpoint.
Let’s assume a couch of 80 inches by 35. Use SimpleDim’s rectangle tool to create a rectangle with exactly those dimensions. Now you have a rectangle which is a to-scale model of your couch. You can move it around in the floor plan, rotate it, or whatever you need. Try putting it on the wall; oh, wait, the TV will go there, let’s put the couch somewhere else. This takes a lot of the guesswork and trouble out of floor planning.
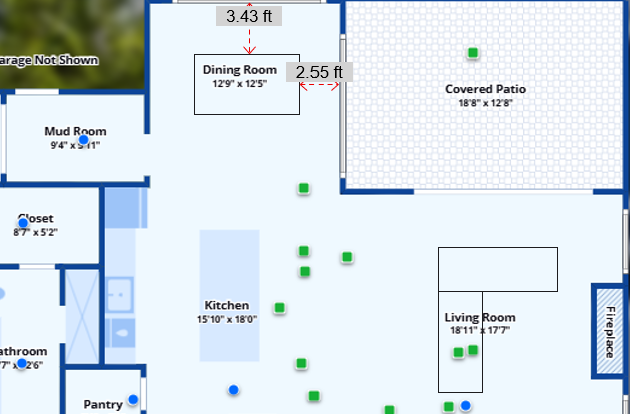
Now add the sectional, the 84″ dining table, check the spacing from walls with the Linear Dimension tool, put shapes in for your chairs, coffee table, and so on. You can get all your space planning done now, not guessing, to-scale, and it only took a couple of minutes.
Try that with a printout, cutouts, and ruler.
So What Does This Mean?
With Powerpoint and a picture, the time between “I have a picture of a space” and “I have usable numbers” is about 5 minutes.
Could you do this in CAD? Sure, if you have a license, the know-how, and patience. Could you do it by hand? If you want do draw, measure, cut-out, and then fire up the calculator or spreadsheet for fractions and adding up space blocks.
The point of doing it in PowerPoint is that you already know how to use it, it’s fast and easy, and when you’re done you can send a slide to a contractor, client ,or spouse, and they can just open it.
This goes well beyond house floor plans. Anywhere you have an image of a space and need a distance, an area, or need to know “will it fit,” the steps are the same: paste, set scale, measure.
Try it yourself with the free trial. You get full functionality, no credit card required, and you’ll have your first numbers in no time at all.