Let’s draw a complete warehouse layout in Powerpoint using SimpleDim. The SimpleDim Powerpoint Add-in extends your Powerpoint app with CAD-lite functionality. It has a number of useful tools, like scales, dimensions, shapes, arrays, and offset.
By themselves, those tools aren’t that impressive. But what you can do with them all together is!
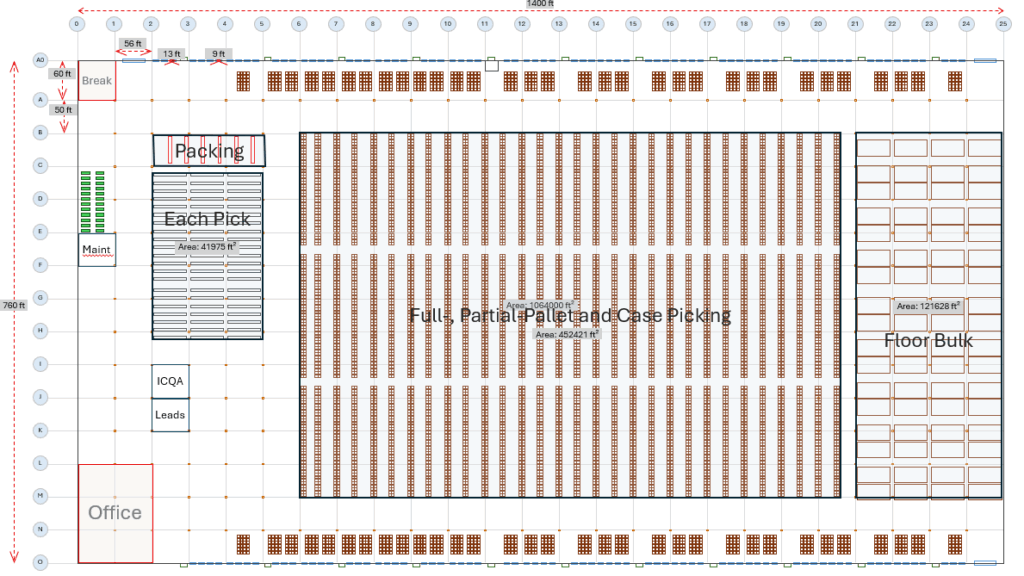
We made this layout in Powerpoint. Unreal, right? This took about an hour, but you can do good, useful layouts in 20-30 minutes with Powerpoint and SimpleDim. Here’s how.
First, Set Your Scale
The first thing to do is figure out what scale to use. It depends how detailed you need to be. For this drawing we’re doing a pretty big building (1.06 million square feet!) so our scale is necessarily a big large to fit everything on the standard slide. But here’s a guide to use for your needs:
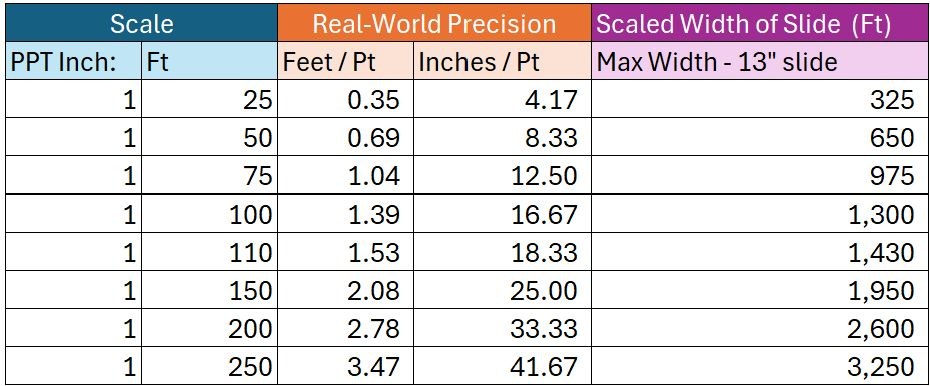
We went with a 1:125 scale for the drawing.
Second: Box and Grids
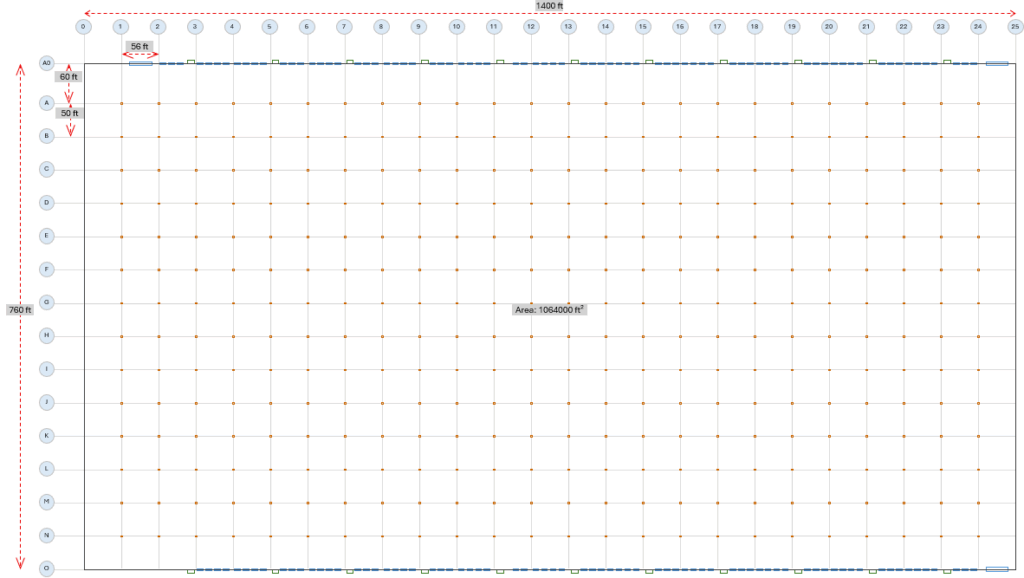
The second step is making the warehouse box and gridlines. To do this we used the SimpleDim Rectangle feature and made the warehouse box 1400′ x 760′. Then we made the box line black with regular Powerpoint shape styling. Done – easy!
The gridlines were a bit trickier. The first step was making a horizontal line approx 1450′ long, and styling it to a light gray.
Then we put it on the warehouse border, and used the Offset command to make the first 60′ speed bay from the top of the warehouse. After making the speed bay, we could use the Array command to make the rest of the 50′ north-to-south column grid line spacing.
Similarly, we made a line at 90 degrees (straight up and down) a big longer than the warehouse is high, so that was about 800′ long. Then we styled it to light gray and put it on the warehouse border with click-and-drag. The columns from west to east are all 56′ spacing (no dock doors on the east or west), so it was a simple Array command with zero additional rows and 20-ish columns at 50′ spacing to make the entire set of gridlines.
Then we made the columns themselves. This could be optional since we already show the gridline intersections, but it’s nice to see them on the drawing. We drew a 2’x2′ box with the SimpleDim Rectangle command, which is larger than the columns would be in real life, but we had to accommodate the powerpoint rendering limitation of 72 points per scale inch.
Then we placed the box on the upper-left-most column line intersection and used the Array command with the 15 rows and 25 columns at 50′ and 56′ spacing respectively… voila! Columns at every gridline intersection.
Last, we put labels on each of the column lines – again, formatting a base shape (circle), adjusting the margins so that the grid labels would fit, and using the Array function to place them along the east-west and north-south grid lines.
Grids and building shell – done!
The final touch was putting dock doors and man-doors on the north and south of the building. For the dock doors, we used a 9′ x 3′ box, formatted blue-line, for visibility and due to Powerpoint’s rendering engine restrictions. Then for the man-doors we used a green box and placed them every two grids.
For readability, we put some SimpleDim Linear Dimensions on the building, grids, and dock doors to show the distances that we drew.
This is what is looked like:
This is already very useful for Operations teams. You can make block diagrams on this and have a very good idea how much space they’ll take up (using the SimpleDim Area Tool).
If you have a CAD shell already, then you could just paste that in to Powerpoint, apply a scale from line, and use that. But if you don’t, then you can still make it on a slide.
Racks and Building Layout
One option for filling the building is blocks. That is, just put boxes in the shell, label them, and check the areas with the Area Tool. That is enough for setting up building flow.
But if you wanted something even more detailed, you could do it.
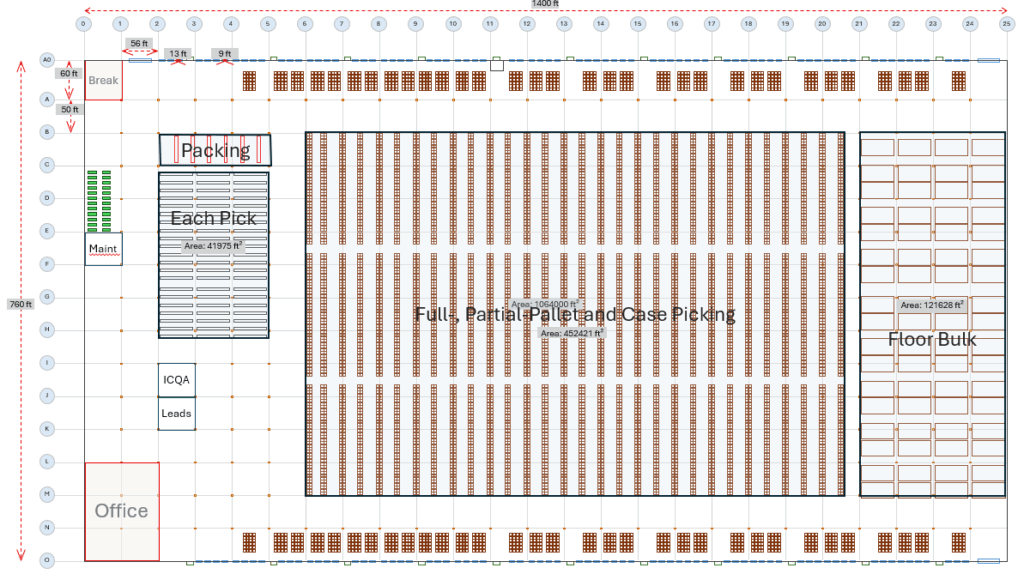
For this building, we drew a pallet at 4′ x 3.8333′ (48″ x 40″). From that, we made some racking layouts and templates, and put those in the building.
The key tools again are :
- Making a shape
- Position and copy it using Offset
- Group shapes if needed, and then
- use Array to make many of them
This general method will let you quickly make repetitive layout structures.
After doing the racking for full-pallet pick and bulk-pick areas, we put in offices and administrative areas like space for maintenance.
The final product looks like this:
Conclusion
Don’t look too hard at the material-flow engineering here (especially you, industrial engineers!). The important thing is being able to draft a layout in Powerpoint quickly and to-scale. You might be surprised at the detail and usefulness you can get in Powerpoint, and it’s much easier to share with your teams than a CAD file.
The Shape, Offset, and Array tools offer powerful ways to quickly draft workable layouts and products in Powerpoint. The Scale and Dimension tools make it realistic and visual to users.
Use SimpleDim to make great slides with accuracy and quality. They’re easier to make and to share than with CAD. You can try it yourself with our 30-day free trial available at SimpleDim.com . Let us know what you think!